When developing .NET applications either for Desktop or Web applications, you will most likely use one of the Visual Studio Editions. As such you need to be familiar with Visual Studio IDE (integrated development environment) and in this article we will examine Visual Studio Environment most important sections.
Getting familiar with the Visual Studio Environment
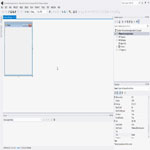
This site focuses on Winforms so let's examine Visual Studio IDE after the creation of a new Winform Project. VS will consist of different areas as shown below. Let's examine most important ones.

Solution Explorer
The Solution Explorer helps you manage projects in your solution. Solution is a container for projects and you can have many projects in a solution. Solution Explorer lets you browse and manage those projects and files. Besides the standard commands of copying, editing, renaming and deleting items, you also have other commands available on contextual menu when right-clicking on an item.

Here is a short list of most common commands you might use:
-
on a Project
- Add new items to the project
- Add References
- Add existing items to the project
- Unload Project
- view / set properties of a project
- Set as StartUp Project
-
on a Solution
- Add New Project to the solution
- Set StartUp Projects
- Add Existing Project to the solution
-
on a Windows Form
- View Code
- View Designer
-
on any file
- Exclude from Project
Properties Window
In .NET everything has properties, from controls to classes and even files. When a control is selected in the Designer, the Properties Window will show design-time properties and events of that control which you can view and edit. With Properties Window you can also view /edit properties of project items selected in a Solution Explorer.

The property name is shown on the left side and its value is on the right side. Those values range from really simple ones like a String or Boolean, to more complex ones like drop-down lists or even dialog boxes. Properties shown in gray are read-only.
If you want to explore all available properties and methods of a particular control, use IntelliSense in the Code Editor.
Toolbox
The Toolbox provides a list of available components /controls from which you can add them into the main window when in Designer View. To get a list of all available controls click on Toolbox on the left side of the main window. You add controls to your form by dragging a control to Designer surface. You can also add control by just double clicking on it.

After it is added to the Designer, the necessary code to create instance of that control will be generated in the active form (you can find that code in .designer.cs file of the form in InitializeComponent method).
If the Toolbox is empty without any controls, you probably have Code Editor opened in the Main Window, so switch back to Design View. Check the next section on different ways to do that.
To manage controls listed in the Toolbox, right-click on any control in the list. The Context menu will show up with quite a few commands:
- Cut, Copy, Paste, Delete
- Rename Item to rename selected control
- Choose Items to change which controls are listed in the Toolbox. This will open up "Choose Toolbox Items" dialog window where you can add and remove controls from the Toolbox.
- Reset Toolbox to restore Toolbox to default settings.
Main Window Space
This is where you will spend most of the time when developing an application. You will write code in the Code Editor and add / rearrange controls to your form in the Designer View. When working in the Designer, you will also use other sections of Visual Studio like Toolbox to drag and drop controls to Designer surface and Properties Windows to modify design-time properties and events of the selected objects.
When control is added to the surface, the Designer will automatically generate necessary code (if you have Form named Form1, the code will be located at Form1.Designer.cs in InitializeComponent method).


You will switch back and forth from a designer to Code Editor frequently, so it is good to know different ways to do that:
- using menu by going to Tool > Code / Tool > Designer
- going to Solution Explorer, right-click on Form and select View Code / View Designer from context menu.
- in Solution Explorer you can also expand the Form and inside it you should see three items (Designer.cs, .resx file and form name without extension). This last item represents the class of the form and by clicking on it you switch to Code Editor.
- in Solution Explorer double-clicking on the Form will open up the Designer View.
Conclusion
There are many areas of the Visual Studio IDE and we looked into the important ones. In the next article, we are going to examine the files and code generated when creating new Winform project.
I hope you have found this article useful. Feel free to drop a comment or share the article on the social networks.


Jeff Mitchell
January 28, 2017Really handy thanks, I've installed Visual Studio before but never known how to use it. I'm familiar with Linux so Visual Studio feels over-assisted by comparison. Never-the-less ... I need to know Visual Studio for my course next month.