When I started to learn WinForm programming, one thing that I wondered was how to create additional window forms on the already existing Winform Project. For example, I wanted to create a popup window for editing purposes. I knew what code to write that would instantiate a new form but didn't know how to edit that form in the designer.
In this article we are going to create a Winform Project from scratch that will contain main form and also one additional regular form which will act as a popup dialog window with OK / Cancel buttons. This popup dialog box will be shown when a button on the main form is clicked. When the popup window closes, the main form will check which button (either OK or Cancel) was clicked.
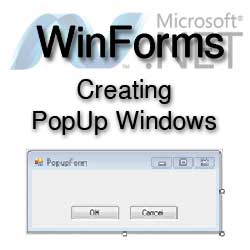
Finished project will look something like this:

So let's start. Follow these steps:
- Start the Visual Studio and create a new WinForms project. If you are unsure how to do that or you have trouble finding the WinForms Template, check the How to create WinForms project using Visual Studio article for more detail.
- Open a ToolBox (View > Toolbox). Once opened, expand the "Common Controls" and drag a Button Control into a form.
Note:You can also add a control to the Form by double clicking the button in the Toolbox.
- Now lets add another Form Window to the project. You achieve this by right-click on project name in Solution Explorer and then select Add > Window Form from the context menu as shown below.
Click image to enlarge
- Add New Item dialog window will appear with Windows Form already selected. Give it a name
PopupFormand click Add or just press enter. - The newly created form will automatically be opened in the designer window. To give it some basic functionality, lets add two buttons to it. Open the Toolbox window and then drag two Button Controls to the form (same way as in step 2). For each of the button we are going to modify two properties.
- Select one of the buttons in
PopupFormform. The properties window should appear on the bottom right side of the Visual Studio.

Find the properties listed below and modify their value as instructed:- In Text property type OK
- In DialogResult property the dropdown menu will be shown. Choose OK as shown in the image above.
Note: DialogResult will be discussed later when we examine code line by line
- Now select the other button and modify the following properties:
- In Text property type Cancel
- In DialogResult property the dropdown menu will be shown. Here also choose Cancel
- Lets also modify appearance of the form by shrinking its size and align the buttons to the center, so that it looks like a standard dialog window:

- Only thing left is to add the code. We need to create a new instance of popup Form when button on the main form is clicked, so select the main form in the Designer. If it is not opened, just Double-click on Form1.cs in Solution Explorer.
- In the main form Double-click on OK button that you dragged in step 2. This will automatically create an empty method named
button1_Click.This method is going to be called when button is clicked. We want this button to open new popup window, so all the necessary code will be contained in this method. - Add the following code to the
button1_Clickmethod as shown below:private void button1_Click(object sender, EventArgs e) { PopupForm popup = new PopupForm(); DialogResult dialogresult = popup.ShowDialog(); if (dialogresult == DialogResult.OK) { Console.WriteLine("You clicked OK"); } else if (dialogresult == DialogResult.Cancel) { Console.WriteLine("You clicked either Cancel or X button in the top right corner"); } popup.Dispose(); } - Run the application by pressing F5 or choose Debug > Start Debugging

Line by line code explanation
Now Let's examine the above code more closely by focusing on highlighted lines 3, 4, 5 and 13:
-
Line 3:
PopupForm popup = new PopupForm();Here we are instantiating the PopupForm class. This class was created in steps 3 and 4 when we selected Add > Window Form and named it
PopupForm. -
Line 4:
DialogResult dialogresult = popup.ShowDialog();For this code you need to be aware of the following things:
ShowDialogmethod will open the form as a modal dialog box. This basically means that the user will not be able to interact with the main form until thePopupFormis closed.- Another feature of the modal forms is that the code after
ShowDialogmethod will not get executed, you guessed it, until the popup form is closed.Note:In reality the form gets only hidden and can be shown again without creating a new instance of the form. - When the form / dialog box closes, it is going to return DialogResult Enumeration value and it will be the same value as the DialogResult property of the button that was clicked.
- If X button was clicked, the form will return the value of DialogResult.Cancel

X button - If the button DialogResult property is set to DialogResult.None, the form will not close.
- If X button was clicked, the form will return the value of DialogResult.Cancel
-
Line 5:
if (dialogresult == DialogResult.OK)Type of variable dialogresult is DialogResult Enumeration, so we compare that variable against the possible values of that enumeration.
-
Line 13:
popup.Dispose();When we do not need the popup form anymore, we dispose of it by calling
Disposemethod. Reason for callingDisposemethod is that when you click either OK or Close button (X button), the popup form will only get hidden and not closed. WithoutDispose()we would create additional instances with every button click on the main form.
I hope you found this article useful. If you still have questions, drop me a comment and I might include your problem with the solution in any future update.

niti s
February 10, 2013Basic example but useful for beginners ....
admin
February 10, 2013Thank you for the comment.
Yes, this article is basically for those who never added additional forms to their projects.
Al
July 15, 2014A good article and example. The code implies you can write to 'Console from a WinForm App. I have never been able to make that work, this code not excepted. Any suggestions?
Thanks.
Do you have any words of wisdom for the beginner on the workings of 'Delegates'?
admin
July 15, 2014Thank you for your comment.
I never had a need to write to Console from Winform app but one easy way to do this is to right-click on Winform project in Solution Explorer and select Properties, then under Application tab, choose Console Application under Output Type.
Regarding the working of Delegates check this article. It explains Delegates in simple terms.
I hope you will find my suggestions useful.
Thanh Nguyen Van
September 4, 2014I'm new to C#, this is a great example and easy to understand.
I hope you'll have more article like this, very useful.
Thank you for your sharing.
admin
September 4, 2014Thank you for the comment. I'm glad you liked it.
Abhay
September 25, 2014Thanks a lot.
A great quick learners guide.
Jithin
December 17, 2014Nice article. Helped me to know that I can use a form itself as pop up instead of an user control. Thanks.
spela
May 13, 2015Thanks! Very useful for beginners, helped me a lot!
Kevin
June 25, 2015Nice article!!! Thank You!
Eric
September 8, 2015Thank you for tutorial. It was very useful.
I have a more complicated question that may build on your code.
I have a main form that upon an event will create and display a child form. I would like to display information in this child form that is constantly changing, for example CPU usage until the user has the data he needs, then it's just a matter of closing the child form as you described.
Is it best to use a Form or is is there something else better suited for this purpose? How do I go about continuously updating the information in the child "window"?
Thanks
Suhas
February 12, 2016It was great, but i already have some application which is developed in solution explorer. now i need to link this model to my previous application, can you tell me how.
admin
February 12, 2016Hi,
If your application is DLL class library containing WinForms and you want to use those Winforms in another Winforms project, then just add a reference of DLL class library to this WinForms project.
Next, in programs.cs include the DLL class library with using statement and then in main, call the Application.Run with the Form in DLL file, something like:
Application.Run(new MyDLLForm());I hope this helps.
Fons
April 16, 2016Thanks for the article!
Just one more thing: How can I read values put into the popup-window's form after it's closed?
All I can think of is storing that data a global variable by the button-click of the popup window. Did I get that right or is there a better way?
admin
April 16, 2016You can create a property in a popup window and make it accessible in a main form. When popup window is open, it stores the data in a property and after it closes you can access that property from the main form.
Rahul Pal
February 15, 2017But how to drag and drop some selected data in the popup window to the base form? When
popup.ShowDialog()is in place, we can't access any other base form or any other form if needed.popup.ShowDialog()make us stay on the popup only, we can go to the base form only if we close the pop up. Need some help in this area to drag and drop items.admin
February 15, 2017What you need is to show modeless dialog and you do that by calling
popup.show()instead ofpopup.ShowDialog(). Check this MSDN article for more information about modal and modeless Windows Forms.And this MSDN article might help you get started with the drag and drop functionality.
bob
March 31, 2017Thank you so much for taking the time to post this super-easy example.
Muhammad
October 2, 2017Good article, but there is no such WinForm add function in VS 2015? What to do?
Thanks
KennZAney1
March 19, 2018Excellent tutorial for a long-time coder who is dipping into C#!
tu jinyu
August 13, 2019As a beginner, this article help me a lot.Thank you so much.
marijn (dutch)
April 20, 2022No, it's
PopupForm popup = new PopupForm();popup.ShowDialog();
Cheyne
September 20, 2022This is perfect! I needed something as basic as possible for my needs, and this was it! Thanks!