When customizing the look of the Contact Form 7 plugin in WordPress, you might want to add your own custom classes to either your form tag, form’s individual elements or validation error alert messages. Validation messages use <span> tag that already contains classes defined by the plugin, so we could simply override those classes, but what if we already have our own classes that we want to use? This post will show how to add classes in validation messages and other elements in the CF7 plugin.
Let’s first examine, how to add our own class to validation alert error messages. We can achieve this using a specific Contact Form 7 filter.
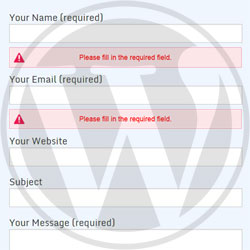
Adding custom class to a validation alert element using a filter
To add custom class to validation message, we need is to use Contact Form 7 wpcf7_validation_error filter. Add the following code to functions.php file.
function cf7_add_custom_class($error) {
$error=str_replace("class=\"","class=\"MyClass1 MyClass2 ", $error);
return $error;
}
add_filter('wpcf7_validation_error', 'cf7_add_custom_class');
The $error variable contains the HTML code of <span> tag validation message. Inside the tag is a class attribute. The above code adds two classes named MyClass1 MyClass2 at the beginning of that class attribute using str_replace function.
You can of course add as many classes as you want.
If for any reason you don’t want to use filters, then you can simply modify styles of classes that the plugin already uses for validation messages. This is shown next.
Customizing Contact Form 7 classes specific for validation message
CF7 uses wpcf7-not-valid-tip class inside validation <span> element. All that is needed is to override that class.
In the example below, we put the following code inside our main style.css file, to make the message fonts bold and dark red.
.wpcf7-not-valid-tip
{
color: #800;
font-weight: bold;
}
To modify style of the field that failed the validation, override .wpcf7-not-valid class.
What about other elements of the plugin? How do we add our own custom class there? This is shown next.
Adding our own class to other Contact Form 7 elements
To add our class names in other parts of our contact form, we don’t need to modify either functions.php or style.css. We can accomplish that directly from the Dashboard.
Add a class to Form HTML tag
To add a custom class to the <form> tag, put html_class attribute inside the CF7 shortcode. An example is shown below:
Individual form elements
For individual elements, we need to edit Contact Form Tags in the template of your contact form.
Go to Dashboard > Contact, choose your contact form and click Edit. In the Form tab, the templates are shown. Insert option class:MyClass inside the field tag between the square brackets [] as shown below:
Here we are adding MyClass custom class to the required text field for the contact name.
Conclusion
Contact Form 7 is a very popular WordPress plugin and to customize it using our own classes, we can modify classes that the plugin uses or we could add our custom classes to the class attribute. In this post, we learned how to do that for <form> tag, for individual element inside the form and for validation error messages.
If you found this article useful, please take a moment and share it on social networks or drop a comment below.


Mohan
December 2, 2020If you are looking for setting custom validation message then a plugin can help you:
https://wordpress.org/plugins/cf7-custom-validation-message/
admin
December 3, 2020Thanks. I guess you are the author of the plugin. I will check it out.