After we create the ASP.NET Core application in Visual Studio, we can use the Visual Studio Publish Tool to create binaries and other set of files that are nedeed to deploy and run our app. The tool supports different publishing methods, such as folder and FTP among others. In this article, we are going to show how to publish ASP.NET Core 3.1 Web App binaries to a local folder.
This tutorial also works with other .NET Core projects like a Console application, but the list of publishing methods and settings will differ from ASP.NET Core App.
Publish Tool is located from the menu at Build > Publish [project name]. We can also right-click on the project inside Solution Explorer and choose Publish from the context menu.
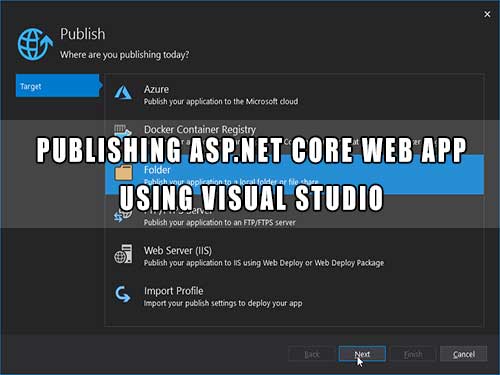
Whichever method we use, the following window should open showing the list of the available publishing methods.

Properties/PublishProfiles is created and the window above will not be shown if you try to run Publish tool again. To repeat the publishing process from scratch, you will have to delete the Properties/PublishProfiles folder.The list depends on the type of project we want to publish. For ASP.NET Core web app, we get the list of the following targets:
- Azure
Publishing to Microsoft Cloud. - Docker Container Registry
When using Docker, we can publish a containerized app to a Docker container registry. - Folder
Publishing to a local folder or folder shared on a network. - FTP/FTPS Server
Publishing using FTP. Note that this is different from SFTP. - Web Server IIS
Publishes the app using Web Deploy. - Import Profile
Import publish settings to deploy an app.
For Console .NET Core app, the list will be smaller as it won't have the FTP/FTPS and Web Server IIS.
In our case, we choose Folder publishing method. In the next window, we choose the location folder where the app will be deployed and click the Finish button.
Next, we choose the publish settings. Those settings will be stored inside a project at Properties/PublishProfiles.

For the ASP.NET Core web application, we can choose from the following options.
- Target location
The location for binary files. We can change the location by clicking Edit under FolderProfile dropdown menu.
- Delete existing files
To delete the existing files inside the target location folder before publishing.
- Configuration
Release or Debug build configuration.
- Target runtime
Portable or Platform specific.
By clicking on the edit icon located near those settings, we get a new window where we configure the settings to our needs.

Let's examine some of those settings:
- Deployment Mode
Here we can choose between Framework-Dependent and Self-Contained. Using Self-Contained, the published folder will also include the .NET Core runtime files, so it's useful for systems that might not have .NET Core runtime files installed, but it will also add additional 90MB in size with the .NET Core 3.1 version. Framework-Dependent on the other hand is a type of deployment in which the app will run on a machine with .NET Core runtime already installed. - Target Runtime
For Target Runtime, we can choose Portable or Platform specific. Note that with Portable, you get binaries for other platforms too (for example.exefile for Windows). - File Publish Options
Here we can choose to erase the content of the publish folder before publishing. We can also choose to publish as a single file.
After publishing is completed using Folder publishing method, the built files will be located inside the publish folder depending on the Configuration setting:
- When using Release Configuration:
\bin\Release\netcoreapp3.1\publish - When using Debug Configuration:
orbin\Debug\netcoreapp3.1\publish\
We can quickly go to the published folder by clicking on a path inside Output Window.

Running the ASP.NET Core Web App
Inside the published folder, we can run our app by running the executable file:
myproject.exefor Windows.myprojectfor Linux.
We achieve the same using the project's .dll file by running the following dotnet command on both Windows and Linux:
Conclusion
With Visual Studio Publish Tool, we can easily deploy our .NET Core app to different targets. In this article, we published ASP.NET Core Web App to a Local Folder. After we choose the publishing method, we can set various settings such as Deployment mode, Configuration, and Target runtime. Finally, we learned how to run the web app once it was published.
