When you have a website that has a lot of snippets of programming code, having some sort of code syntax highlighter is a must. In this article, we are going to add a Highlight.js library to a WordPress website. We are also going to examine three of its plugins that extend the functionality of the highlighter library.
This site first used the dedicated syntax highlighter WordPress plugin, but then it didn't get updated for more than a year. I checked for other WordPress syntax highlighting plugins but decided it's better not to rely on them, and instead went to install a JavaScript library on the theme itself.
First I used the code-prettify library from Google, but in 2020 it got discontinued and is no longer being maintained, so now this website is using the highlight.js library.
About highlight.js library
The highlight.js library supports almost 200 languages and 250 styles. We can see the examples on this demo page.
Here is the example of Python highlighting.
And CSS highlighting:
By default, the highlight.js will highlight all the code found inside the <pre><code> block:
What languages are supported?
The default core library contains about the 30 common languages, but there is support for 180. We can find the whole list here.
When the highlight.js library is enabled, it will try to automatically guess for each <pre><code>...</code></pre> block, which coding language is used. With short code snippets, the language detection is not very accurate, but luckily, we can tell the highlighter which language to use by adding "language-X" class inside either <pre> or <code> where X is the name of the language.
For example, if we want to tell it the language is Python, we would do this:
Step 1 - Add links of highlight.js library files to WordPress
To make the highlight.js library work in WordPress, we need to first add references to JavaScript highlight.js file and .css style files.
For WordPress, we would put the library files in the theme folder, but we can also make use of CDN (content delivery network). In this case, we reference links found on this highlight.js CDN page. It includes many highlight.js related links, from the main core highlight.js script file to all the available styles and also additional languages not included in the main library.
Whichever method we use, either hosting library files in the WordPress theme folder or just using CDN links, we need to add references to these files on the WordPress website.
Quick way - Adding the references directly to header.php theme file
For WordPress, we can quickly add both of the core script and style in header.php theme file. In the examples below, we reference the links of CDN highlight.js files, one is the theme style file and the other is the core .js library.
We would put both of the lines before the <?php wp_head(); ?> in header.php file.
But a proper way to add scripts and styles in WordPress is to enqueue scripts and styles.
Correct way - Adding the references using wp_enqueue functions
The WordPress has special functions wp_enqueue_script() for scripts and wp_enqueue_style() for styles in which we tell what script/style to load and what their dependencies are. With scripts, we can also tell it if they should be added in the footer or the header.
Since the syntax highlighter will be used in the front-end of a website, we will need to use the wp_enqueue_scripts hook for these functions in the functions.php theme file, something like this:
function add_highlight_assets() {
wp_enqueue_style( ... );
wp_enqueue_script( ... );
}
add_action( 'wp_enqueue_scripts', 'add_highlight_assets' );
wp_enqueue_scripts it is also used for enqueuing styles.Both functions have many parameters, but we are only interested in the first two:
- unique name
- path to the stylesheet or script, either full URL or relative path to WordPress root directory.
Let's see how to add styles and scripts in more detail.
Adding styles
To add styles, we use wp_enqueue_style() function.
In the case of using CDN, we would use it like this:
And in case of having the styles in the theme folder, it would be:
Now, let's focus on scripts.
Adding scripts
Adding the scripts is the same as with styles, except we use wp_enqueue_script() WordPress function.
We use it like this in the case of CDN:
and for script in the theme folder, we would use:
Putting it all together
When using CDN highlight.js links, we would put the following code in the functions.php theme file:
function add_highlight_assets() {
wp_enqueue_style( 'highlight', 'https://cdnjs.cloudflare.com/ajax/libs/highlight.js/11.3.1/styles/vs.min.css');
wp_enqueue_script( 'highlightjs', 'https://cdnjs.cloudflare.com/ajax/libs/highlight.js/11.3.1/highlight.min.js' );
}
add_action( 'wp_enqueue_scripts', 'add_highlight_assets' );
And when using highlight.js files in the theme folder, the code would look like this:
function add_highlight_assets() {
wp_enqueue_style( 'highlight', get_template_directory_uri() . '/vs.min.css');
wp_enqueue_script('highlightjs', get_template_directory_uri() . '/highlight.min.js');
}
add_action( 'wp_enqueue_scripts', 'add_highlight_assets' );
By default, the scripts will be added in the header, where <?php wp_head(); ?> is located.
Step 2 - Enable the highlight.js library
After referencing the script and style files, we need to start the library. This script needs to be added after referencing the JavaScript files, probably best place for it is in the footer.php theme file, after <?php wp_footer(); ?>.
This is the function that will highlight all the code syntax that are located inside the <pre><code> blocks of the current page.
Step 3 - Add HTML encoded syntax code inside <pre><code> tags
Before we add the code we want to highlight, we have to do one more step. We need to HTML encode our code syntax, as certain characters have special meaning in HTML and the browser will interpret them as a part of the HTML if they are not properly HTML encoded.
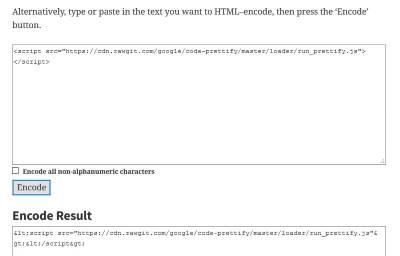
The easiest way to achieve this is to find some online HTML encoder, like this one (shown below):
Simply copy your code syntax inside the windows and click the 'Encode' button. You can leave the checkbox about converting all non-alphanumeric characters unchecked. Copy the encoded version from "Encode Result" window and paste it into the post editor in WordPress inside the <pre><code>...</code></pre> block.
Let's look at an example of the HTML code that is filled with special HTML characters and we want to insert it into our post editor in WordPress.
To display the following:
<!DOCTYPE html>
<html>
<head>
<title></title>
</head>
<body>
<canvas id="canvas"></canvas>
</body>
</html>
We would put this in the WordPress post editor as raw text:
The encoded HTML code will make sure that the highlighted syntax containing the special characters will be displayed and not processed by the browser.
Extending highlight.js functionality with plugins
The core highlight.js library is lacking some features we might expect from the syntax highlighter library, but we can add various plugins created for the highlight.js library to extend its capabilities. Let's examine some of the most useful ones, such as line numbering, highlighting specific lines, and adding a copy button.
header.php file or using wp_enqueue functions.Adding line numbering to your highlighted code
If you are highlighting a code syntax with many lines, the line numbers might become very useful. This is what the Highlight.js line numbers plugin does.
Here is the example of the line numbering for the same Python code as seen earlier:
my_list_set=set(my_list)
my_dict_set=set(my_dict)
if my_list_set.intersection(my_dict_set):
    print("At least one element was found. Do something.")
Adding & activating the plugin
First, we need to reference the plugin script file into WordPress, the same way as with the highlight.js library. We just need to add it after the highlight.js script file.
Next, we initialize the plugin by calling the following function:
This function needs to be called after calling the hljs.highlightAll(); function which activates highlight.js.
Customizing the line numbering
If you have multi-line code and don't want to show line numbers, we can use the .nohljsln class:
We can also use the data-ln-start-from attribute to tell it at which line we want the line numbering to start from:
This will start the line at number 10:
my_list_set=set(my_list)
my_dict_set=set(my_dict)
if my_list_set.intersection(my_dict_set):
    print("At least one element was found. Do something.")
Highlighting specific lines in the code
Sometimes we want to highlight or emphasize specific lines with some background color. This is what the highlightjs-highlight-lines.js plugin offers.
To highlight specific lines, We need to add the following JavaScript code in your WordPress Post editor.
<script>
hljs.highlightLinesAll([
[],[],[],
[{start: 1, end: 1, color: '#888 '}, {start: 3, end: 4, color: '888'},],
]);
</script>
In the above example, we will highlight line 1 and lines 3-4 in the 4th code block. First [] corresponds to the first code block in the post, the second [] to second, and so on.
Example of the previous Python code, but with highlighting:
my_list_set=set(my_list)
my_dict_set=set(my_dict)
if my_list_set.intersection(my_dict_set):
    print("At least one element was found. Do something.")
Adding the plugin
Again, we need to reference the plugin script file into WordPress, the same way as with the highlight.js library.
We need to add the reference after the highlight.js script file and if we also use the line numbering plugin, we need to add it after that one too.
Now let's focus on a plugin that adds a badge on the highlighted syntax code for easier copy/pasting.
Adding copy to clipboard button of your code syntax
Instead of your visitor manually selecting the highlighted code and copying it, the HighlightJs Copy Code Badge Component plugin generates a "Copy Badge" button. By clicking on it, it will copy the content of the code block into a clipboard.
The example of copy badges can be seen in this article. The badge displays the language that the highlighter.js library used and a "Copy" icon for copying the code into a clipboard.
Adding & activating the plugin
We reference the plugin script file into WordPress, the same way as with the highlight.js library. As with other highlight.js plugins, we need to add it after the highlight.js script.
To activate, we would put this in the footer.php file, after we activate the highlight.js:
<script>
    // apply HighlightJS
    var pres = document.querySelectorAll("pre>code");
    for (var i = 0; i < pres.length; i++) {
       hljs.highlightBlock(pres[i]);
    }

    // add HighlightJS-badge (options are optional)
    var options = {   // optional
       contentSelector: "#ArticleBody",

       // CSS class(es) used to render the copy icon.
       copyIconClass: "fas fa-copy",
       // CSS class(es) used to render the done icon.
       checkIconClass: "fas fa-check text-success"
    };
    window.highlightJsBadge(options);
</script>
Visibility with the badge
One issue with the badge might come if we wanted to hide the copy badge on the specific snippet. This issue can be solved by adding a CSS rule to the badge as shown below. We would then use <pre class="no-badge"> to hide the badge.
pre.no-badge .code-badge {
display: none;
}
Another issue might be if we want to only hide the language in the badge. In this case, we would use <pre class="no-lang"> to only hide the language displayed on the badge.
pre.no-lang .code-badge-language {
display: none;
}
Compatibility with highlightjs-highlight-lines.js plugin
Currently, when the badge plugin is used with the Highlight.js line numbers plugin, the newline characters are not copied in the clipboard.
I solved this issue by changing the following line in the badge plugin highlightjs-badge.js script.
From:
var text = $code.textContent || $code.innerText;
to this:
var text = $code.innerText;
Conclusion
In this article, we examined what the highlight.js library offers and how to add it to the WordPress website. We then looked closely at three plugins that extend its functionality. One plugin is used to display line numbers, then there is a plugin for highlighting specific lines with a background color and a plugin that adds a badge to copy the code with one click into a clipboard.


