To interact with Flutter, we use the flutter command-line tool. We can give it a variety of commands, but the focus will be on the flutter create command. First, we'll go over how to use it to create new Flutter projects and then we'll go through the list of the command line arguments available for the create command with additional information provided for some of them.
The flutter command-line tool is mostly used to manage app development by giving it a command followed by arguments:
List of commands for the "flutter" tool
To list all the available commands, we type in the terminal:
The flutter CLI has many commands, here are commands that deal with projects:
| analyze | Analyze the project's Dart code. |
| assemble | Assemble and build Flutter resources. |
| build | Build an executable app or install bundle. |
| clean | Delete the build/ and .dart_tool/ directories. |
| create | Create a new Flutter project. |
| drive | Run integration tests for the project on an attached device or emulator. |
| format | Format one or more Dart files. |
| gen-l10n | Generate localizations for the current project. |
| pub | Commands for managing Flutter packages. |
| run | Run your Flutter app on an attached device. |
| test | Run Flutter unit tests for the current project. |
The rest of this post will focus on the flutter create command.
flutter help <command>.Creating a project with the flutter create command
We use the "flutter create" command to create a new Flutter project. If the project already exists, any missing files will be recreated. We use it like this:
To create a default app Flutter project, we may ignore the arguments and only specify the output directory where all the project files will be created.
The output directory must contain a valid dart package name (all lowercase with an underscore between words), for example:
A project named my_start_app will be created inside the directory with the same name.
Running a project with the "flutter run" command
After creating the project, go inside the newly created project folder and run the project:
The flutter should now ask you on which platform you want to run the project.
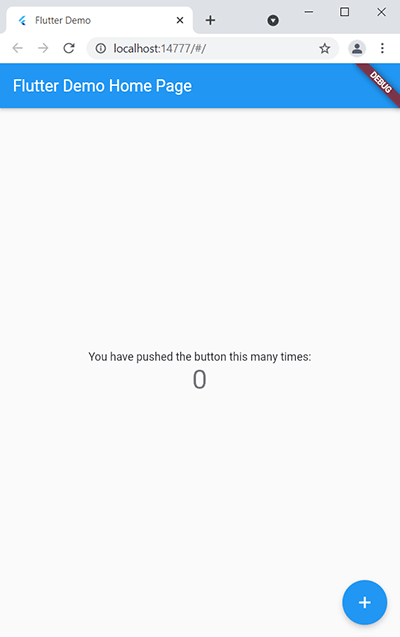
After selecting a platform, the project will run in debug mode. The project itself will be a fairly simple counter app as seen below:

The starting point for the project is located at lib/main.dart file. This is where you'll find the counter app's logic and user interface.
Let's turn our attention to the command-line arguments.
Command-line arguments for the "flutter create" command
Below is the list of all the available parameters for the create command:
| -h, --help | Print this usage information. | ||||||
| --[no-]pub | Whether to run "flutter pub get" after the project has been created. (defaults to on) |
||||||
| --[no-]offline | When "flutter pub get" is run by the create command, this indicates whether to run it in offline mode or not. In offline mode, it will need to have all dependencies already available in the pub cache to succeed. | ||||||
| --[no-]overwrite | When performing operations, overwrite existing files. | ||||||
| --description | The description to use for your new Flutter project. This string ends up in the pubspec.yaml file. (defaults to "A new Flutter project.") |
||||||
| --org | The organization responsible for your new Flutter project, in reverse domain name notation. This string is used in Java package names and as prefix in the iOS bundle identifier. (defaults to "com.example") |
||||||
| --project-name | The project name for this new Flutter project. This must be a valid dart package name. More Info ↓ |
||||||
| -i, --ios-language | The language to use for iOS-specific code, either ObjectiveC (legacy) or Swift (recommended). [objc, swift (default)] |
||||||
| -a, --android-language | The language to use for Android-specific code, either Java (legacy) or Kotlin (recommended). [java, kotlin (default)] |
||||||
| --platforms | The platforms supported by this project. Platform folders (e.g. android/) will be generated in the target project. This argument only works when "--template" is set to app or plugin. When adding platforms to a plugin project, the pubspec.yaml will be updated with the requested platform. Adding desktop platforms requires the corresponding desktop config setting to be enabled. [ios (default), android (default), windows (default), linux (default), macos (default), web (default)] |
||||||
| -t, --template=<type> | Specify the type of project to create.
|
||||||
| -s, --sample=<id> | Specifies the Flutter code sample to use as the "main.dart" for an application. Implies "--template=app". The value should be the sample ID of the desired sample from the API documentation website. An example can be found here. More Info ↓ |
||||||
| --list-samples=<path> | Specifies a JSON output file for a listing of Flutter code samples that can be created with "--sample". More Info ↓ |
Additional information about the command line arguments
In this section, additional information for some of the command-line arguments mentioned above has been added. Not many arguments are in this section currently, but more might get added in the future.
Using the --sample argument
This command, as the name implies, deals with samples. A sample is useful if we want to develop a starting Flutter project for a specific widget instead of the basic counting app.
To use the --sample argument, we need to provide it with a valid id of the sample.
For example, to create a project with the sample of SingleChildScrollView widget, we would give the following flutter command:
Using the --list-samples argument
With Flutter version 3.0.3, there are 543 samples with some widgets having more than one sample to demonstrate different settings and some widgets will also have samples for "material", "cupertino" & "widgets" libraries while using the exact same content of the main.dart source file.
We can use the --sample command to generate a list of all available samples in JSON format.
The <path> specifies the location of the JSON output file where the list will be saved.
Here's an example of an entry from the created JSON file:
{
    "id": "material.ScaffoldState.showBottomSheet.1",
    "element": "ScaffoldState.showBottomSheet",
    "sourcePath": "lib/src/material/scaffold.dart",
    "sourceLine": 2493,
    "channel": "stable",
    "serial": "1",
    "package": "flutter",
    "library": "material",
    "copyright": null,
    "description": "This example demonstrates how to use `showBottomSheet` to display a\nbottom sheet when a user taps a button. It also demonstrates how to\nclose a bottom sheet using the Navigator.",
    "file": "material.ScaffoldState.showBottomSheet.1.dart"
}
Using the --project-name argument
When creating a new project with flutter create, we must specify the output directory. This will create a folder that will contain the Flutter project with the same name. The project name needs to be a valid Dart package name (lower case with underscores), otherwise. we get an error.
For example, if we try to create a TestApp project:
We get the following error message:
See https://dart.dev/tools/pub/pubspec#name for more information.
We can use the --project-name argument to provide the Flutter with the valid dart package name and at the same time give a folder name that does not follow the dart package naming requirements.
In the previous example, we could create a folder TestApp but have a project with a valid dart package name test_app using the following command:
Creating project files on the current directory
Another use of the --project-name argument is when we want to create all project files in the current directory. We just put the . (dot) for output directory like so:
Using the --template argument
The skeleton template is for developers who require more than what the default counter app provides. It is larger than a counter app and contains a static list/detail as well as a dynamic settings feature. To learn more about the skeleton template, check this article.
Conclusion
In this tutorial, we looked at all of the available commands for the flutter command-line tool. Then we focused on the flutter create command which is used to build new Flutter projects. We then listed all the options available for it and for some of them, additional information has been provided.


