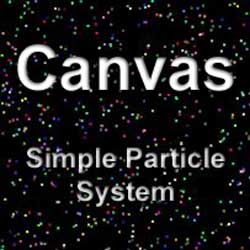
Recently I started to learn how to use canvas HTML5 element and the first thing I tried to do was to draw a small rectangle. Next, I wanted to an add animation loop and move that shape. After that worked, I wanted to add a bunch of them all moving in different directions and this is how my first particle system was born. This article will show you how to create one yourself. The particle system is a pretty basic one. Each particle gets a random color, random direction, and random speed when they are created. After they reach the edge of the canvas, they will bounce off of it.
So let’s begin. To see the end result, check the working demo at the end of the article.
Adding HTML and CSS
First, let’s add the HTML and CSS file.
HTML file
The HTML below contains the minimum it requires to be a valid HTML5 document, with links to external CSS file (line 6) and JavaScript file (line 10). It also contains a <canvas> tag (line 9).
<!DOCTYPE html>
<html>
<head>
    <title></title>
    <meta charset="utf-8" />
    <link href="style.css" rel="stylesheet" />
</head>
<body>
    <canvas id="canvas"></canvas>
    <script src="particle.js"></script>
</body>
</html>
The link to JavaScript file is located before the ending </body> tag, so that the JavaScript code can reference objects in the HTML file. In our case, <canvas> element will be referenced.
CSS File
And here is the CSS file.
body {
    margin:0;
    padding:0;
    background:#000;
}

canvas {
    display:block;
}
Both margin and padding are set to 0 to remove white space from the corners. The canvas element is set to be a block element. The reason for that is to prevent scroll bars from appearing in the browser when we later set the size of the canvas to 100% of the browser window's viewport.
Now let’s add JavaScript code inside particle.js file. The whole JavaScript code contains about 50 lines. The code is split into several sections so that it is easier to understand what each part does. To copy all the JavaScript code at once, check the working demo at the end of the article.
Adding setup code
First, some setup is needed.
var canvas = document.getElementById("canvas");
var ctx = canvas.getContext("2d");
canvas.width = window.innerWidth;
canvas.height = window.innerHeight;
var particles = [];
var num_particles = 1000;
Quick code explanation:
-
Line 2
The code first gets a 2d drawing context. Canvas itself is just a drawing surface without any drawing capabilities. The context is the one with methods and properties for drawing graphics.
-
Lines 3, 4
Next, the canvas size is set to be the size of browser window's viewport.
-
Line 5
All particle objects will be stored in
particlesarray. -
Line 6
The
num_particlesdefines how many particles to create. In our case, that number is 1000.
Next, let’s add any helper functions that the particle system might need.
Adding helper function
Each particle will get a random color. So we need a function that does that.
function GetRandomColor() {
    var r = 0, g = 0, b = 0;
    while (r < 100 && g < 100 && b < 100)
    {
        r = Math.floor(Math.random() * 256);
        g = Math.floor(Math.random() * 256);
        b = Math.floor(Math.random() * 256);
    }

    return "rgb(" + r + "," + g + ","  + b + ")";
}
Applying fill color to the shape is done by fillStyle property, which specifies a color or a style. For colors, it expects a string and valid strings are those of CSS <color> values. Here are some examples for the white color:
- "white"
- "#FFFFFF"
- "rgb(255,255,255)"
- "rgba(255,255,255,1)"
The function first makes sure that the generated color has at least one component (either red, green or blue) a value above 100. This is to prevent generating too much of dark color on the already dark background. Once generated, the function above returns the values as a rgb() string,
In the next step, we will create our Particle object.
Creating Particle object
First, we create a constructor for the object.
var Particle = function () {
        this.x = canvas.width * Math.random();
        this.y = canvas.height * Math.random();
        this.vx = 4 * Math.random() - 2;
        this.vy = 4 * Math.random() - 2;
        this.Color = GetRandomColor();
}
Each Particle object that will be created will have a random value on each of its properties.
Properties are as follows:
-
Lines 2, 3
Position of particle in the canvas (0,0 is the top left).
-
Lines 4, 5
Velocity of the particle ranging from –2 to 2 (to be precise, Math.random will never return exactly 2 but that is not important in our case). At each frame, position
x,yposition is updated byvx,vyamount. -
Line 6
Color of the particle. This is where we use the random color function from the previous step.
Next, we will extend the Particle object by adding some methods to it.
Adding methods to Particle object
We will add only two methods:
Draw function
This one is simple, it draws the particle.
Particle.prototype.Draw = function (ctx) {
    ctx.fillStyle = this.Color;
    ctx.fillRect(this.x, this.y, 2, 2);
}
Draw function renders a rectangle at its current position and fills it with a color that was randomly generated when the particle object was first created. The size of the rectangle is set to 2x2.
Update function
The Update first updates the position by adding the current position with velocity (line 2, 3) and then checks if the updated position reached outside of the boundary / border of the canvas (line 5-9).
Particle.prototype.Update = function () {
    this.x += this.vx;
    this.y += this.vy;

    if (this.x<0 || this.x > canvas.width)
        this.vx = -this.vx;

    if (this.y < 0 || this.y > canvas.height)
        this.vy = -this.vy;
}
Particle crosses the boundary when:
- x position is less than 0 or larger than canvas width.
- y position is less than 0 or larger than canvas height.
When this happens, the code reverses the sign of velocity variable that is the cause of this boundary crossing. By inverting the sign, we create a bounce effect.
Example:Let's say x new position after update (line 2) is –0,5. What happens is the following:
|
We are almost done. In the next step, we will create an animation loop.
Adding an animation loop
This is the main loop of the particle system.
function loop() {
    ctx.clearRect(0, 0, canvas.width, canvas.height);

    for (var i = 0; i < num_particles; i++) {
        particles[i].Update();
        particles[i].Draw(ctx);
    }
    requestAnimationFrame(loop);
}
Code explanation:
-
Line 2
First, the whole canvas is erased.
-
Lines 4-7
Next we loop through every particle in the array, so that for each Particle object,
Update()andDrawmethod is called. -
Line 8
To make sure that the animation continues in the next frame, requestAnimationFrame() function is called with a callback function argument to the same
loop()function. This tells the browser to call loop() again when the browser is ready for the next repaint.
Almost done. All that is left is to create particle objects and start the animation.
Create particles and start the loop
The for loop will create Particle objects and add them into particles array. How many depends on num_particles value set in the beginning.
for (var i = 0; i < num_particles; i++)
    particles.push(new Particle());

loop();
Then we call loop() function for the first time to kick off the animation and we are done.
Particle System in action
Here is the end result:
See the Pen
Simple Particle System by HowToSolutions (@HowToSolutions)
on CodePen.
Conclusion
Trying to create a particle system is a great way to learn about drawing multiple shapes on canvas and animating them. The particle system in this article is a simple one and can be used as a starting point for a more sophisticated version.

ratcompopund
November 15, 2017great tutorial- thanks a bunch
meemaw
June 12, 2018Just what I had been looking for. Awesome work. Thank you
abiolao
April 13, 2019how do you increase the size of particles?
admin
April 13, 2019Hi,
You just need to increase the number of 3rd and 4th parameter of ctx.fillRect function:
ctx.fillRect(this.x, this.y, 3, 3);Darren Quinton
August 9, 2019This tut is so incredibly straightforward and simply put, you have my genuflect!