When creating a new ASP.NET MVC project in Visual Studio, the project will use a Bootstrap front-end framework by default. But there are more sophisticated templates with extended functionality available. One of them is AdminLTE, a dashboard & control panel theme also built on top of the Bootstrap. This article will show you how to replace the default Bootstrap framework with the AdminLTE template in an ASP.NET MVC project for the .NET framework.
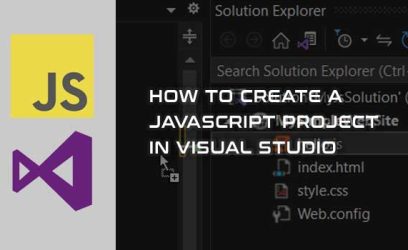
Let’s first create an ASP.NET MVC Project using Visual Studio:
- Start the Visual Studio and select "Create new project". If you are already inside Visual Studio, go to File > New > Project.
- "Create a new project" window will show up with list of available templates. In the search field, type mvc and select "ASP.NET Web Application (.NET Framework)" and click Next.
Note: If you don’t see the "ASP.NET Web Application (.NET Framework)" template and only see "ASP.NET Core Web App" listed, you might need to install additional components for the .NET Framework templates. - Give the project a name and click Create.
- A "Create a new ASP.NET Web Application" window will show up.
-
On the right side, under "Advanced", there will be a checkbox selected for the "Configure for HTTPS". The Visual Studio will create a self-signed SSL certificate, so we can develop applications over HTTPS, but if you run the project on Firefox, you might get the "Secure Connection Failed" error message. Check this solution to fix the issue.
Note: The SSL is not needed for this article, so you can deselect this option. - On the left side, we can choose between different ASP.NET templates. Select MVC project template and click Create.
-
On the right side, under "Advanced", there will be a checkbox selected for the "Configure for HTTPS". The Visual Studio will create a self-signed SSL certificate, so we can develop applications over HTTPS, but if you run the project on Firefox, you might get the "Secure Connection Failed" error message. Check this solution to fix the issue.
The default ASP.NET MVC project looks like this:

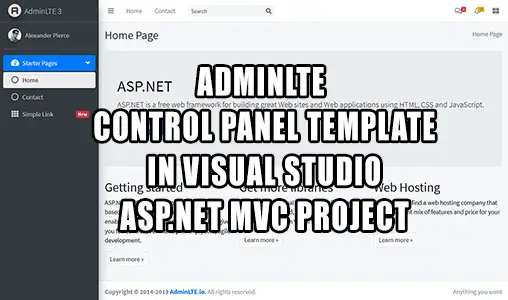
Now that the project has been created, let’s add an AdminLTE template inside this project. The end result will look something like this:
There is an AdminLTE NuGet package available, but it hasn't been updated for years now, so we are going to get the necessary files from the AdminLTE Github page and copy those files into our project.
Bur first, we need to update the jQuery & Bootstrap JavaScript libraries currently used in the ASP.NET MVC Project.
1.) Updating jQuery and Bootstrap in ASP.NET MVC Project
The AdminLTE dashboard depends on two main frameworks, Bootstrap, and jQuery. The AdminLTE v3.2.0 uses the jQuery v3.6.0, while the Visual Studio uses older jQuery v3.4.1 in the ASP.NET MVC project. With Bootstrap, it's a similar story. The AdminLTE v3.2.0 uses the Bootstrap v4.6.1, while the ASP.NET MVC project uses older Bootstrap v3.4.1.
We can check which versions of the libraries the ASP.NET MVC project uses, update to newer versions or install additional libraries using the Manage NuGet Packages tool.
The Manage NuGet Packages tool
To update both the jQuery and the Bootstrap Framework of the current ASP.NET MVC project, we do the following:
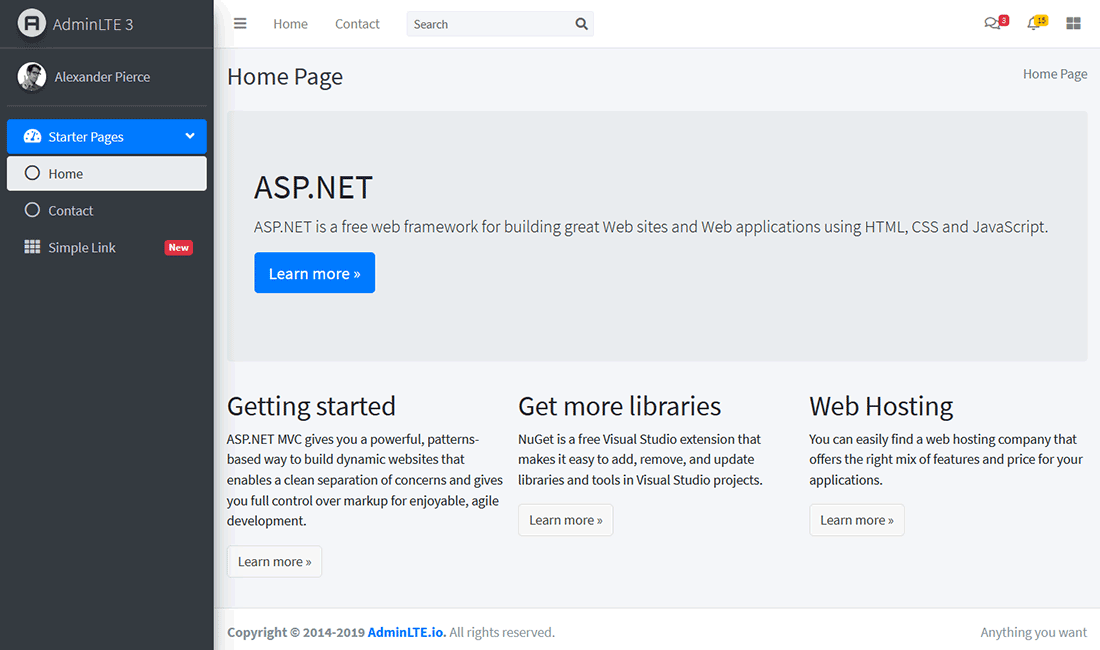
- In "Solution Explorer", right-click on the project and select “Manage NuGet Packages”:

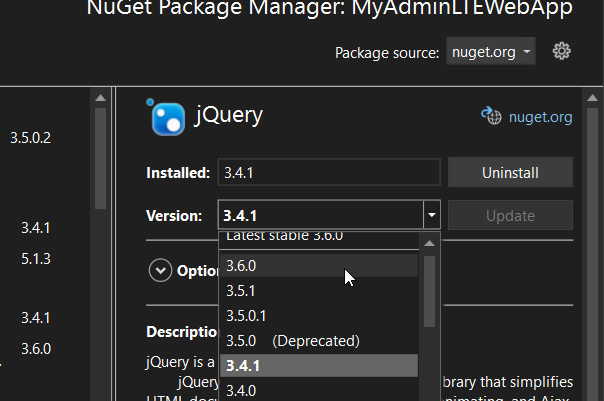
- A NuGet Package Manager window will open. Select Installed tab which will list currently installed libraries. Select the "Bootstrap by The Bootstrap Authors, Twitter inc." package:
Click image to enlarge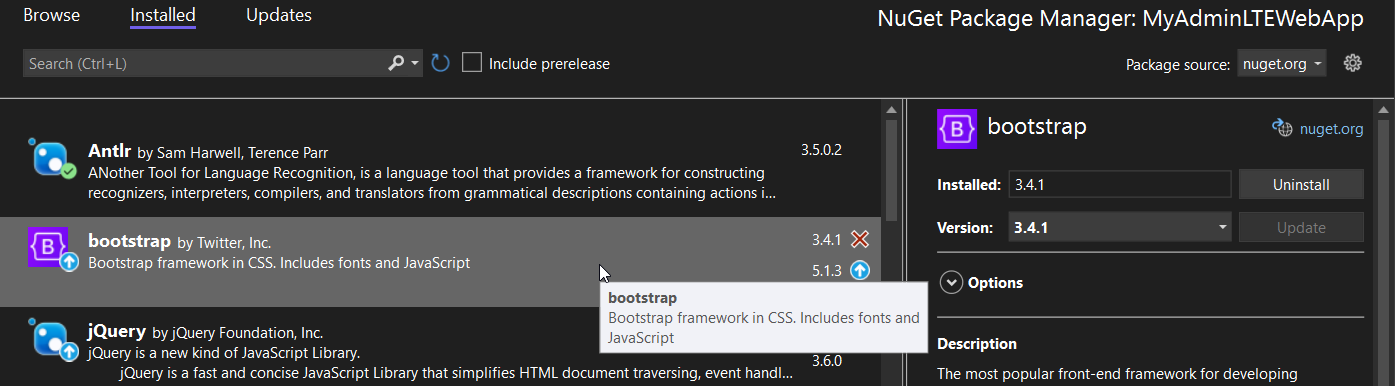
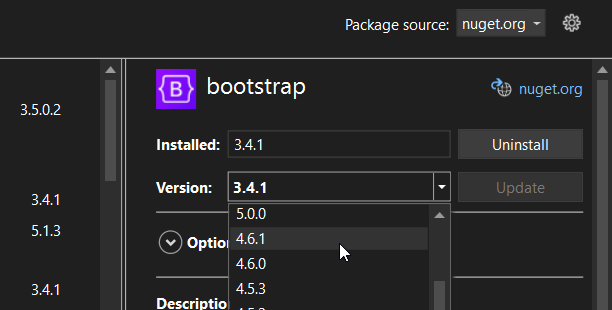
- On the right side, for Version:, open the dropdown menu and choose the Bootstrap version 4.6.1 as this is the version that the AdminLTE v3.2.0 is using:
- Click on the Update button. A Preview Changes window might open, showing you the changes the Visual Studio will do to the solution. Click the OK button to continue.
Note: This might take a few minutes and after it is finished, the NuGet Package Manager tool will reload with Bootstrap showing "Installed: 4.6.1".
- Now we just need to update the jQuery. Still under "Installed" tab, find the jQuery package and select it.
- Select the Version: dropdown menu and choose the jQuery version 3.6.0:
- Click on Update. A Preview Changes window will again open. Click OK and wait for the installation to finish. The Version: for jQuery should now show 3.6.0.
Scripts folder. Inside it, you should see jquery-3.6.0 files and for Bootstrap, double-click on bootstrap.js file. At the beginning of the file, it should say "Bootstrap v4.6.1".Now, let's focus on adding AdminLTE files to our ASP.NET MVC project.
2.) Getting AdminLTE files from GitHub
Go to AdminLTE GitHub release page, find the AdminLTE v3.2.0 version, download the source code and extract the files somewhere in your computer.
3.) Copying extracted files into Visual Studio project
We will now copy the necessary files into our ASP.NET project in Visual Studio.
- Go to the folder containing extracted files we got from GitHub and go to the
distfolder. It should contain three folders:css- containing stylesimg- containing imagesjs- containing JavaScript files
In a minute, we are going to copy them into a Visual Studio, but before we do that, we will make a new folder into our project.
- In VS, go to Solution Explorer, right-click on your project and select Add > New Folder. Name that folder
adminlte.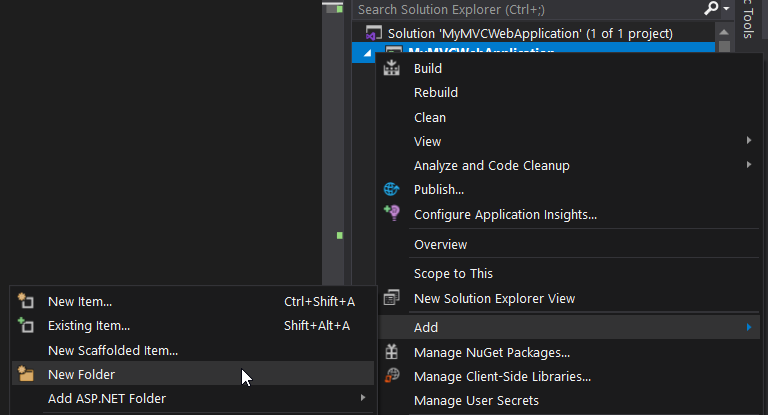
-
Now, open the Windows Explorer and go inside the
distfolder and Copy all three folders into the newly createdadminltefolder inside Solution Explorer in Visual Studio.You can do this in different ways. You could right-click on three folders in Windows Explorer and select "Copy" then right-click the
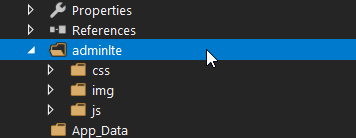
adminltefolder in VS solution Explorer and select Paste. You could also just use drag and drop instead of Copy/Paste.Whatever technique you used, the ASP.NET project in solution explorer should now look like this:
Now that we copied the necessary files, let's focus on the Layout of the AdminLTE dashboard.
4.) Changing ASP.NET Layout to the one used by AdminLTE
We will use the AdminLTE starter page to replace the content of the current layout of the ASP.NET MVC project.
In the previous step, we copied the content of the dist folder using Windows Explorer into a Visual Studio. Inside Windows Explorer we need to go up one level from dist folder, so we are at the root "AdminLTE-3.2.0" folder of the extracted files. Now find the starter.html file and open it in Visual Studio or some other text editor.
For the ASP.NET MVC project, the main layout file is the _Layout.cshtml file, a Layout View located at Views > Shared > _Layout.cshtml. It is similar to the ASP.NET master page. With the Layout View, we make sure, that we will have a consistent look across our website.
Remove everything from _Layout.cshtml and replace it with the content of Starter.html. But, there are few lines of Razor code and a few additional lines inside _Layout.cshtml that we still need, so in the next section, we are going to add them back into our new layout.
5.) Adding missing Razor code into the new layout
We need to add the razor code inside the <head> tag and the <body> tag.
In the <head> tag
- Find:
The first line references the styles for FontAwesome icon library. We will add this into our project in step 8 and in step 8a. The Second line references the main AdminLTE styles which were added when we copied the content of the
distfolder in step 3. - Remove those two lines and replace them with:
So, what are
@Styles.Renderand@Scripts.Render? They are used to render bundles of scripts and styles defined in App_Start > BundleConfig.cs file. Bundling has been added in ASP.NET 4.5. With this feature, we can bundle multiple script/style files into a single file and also minify them. All this improves the load time of the website. To learn more, check this MSDN page.We are going to edit the App_Start > BundleConfig.cs file a bit later.
Inside the <body> tag
-
We have Navbar links and we will render them using the Razor code:
Find:
And replace it with:
Find:
And replace it with:
One feature we are lacking here is to add Bootstrap active class to either
<li>or the@Html.ActionLink()when the link is the same as the current page. One way to achieve this is to test which Controller and which View is the current one. Check this StackOverflow page for various solutions to this problem. -
We also have navigation links in the Sidebar menu:
Find:
Inside it, you will see anchor tags with a
<i>tag in them.For Navbar navigation links, we used
@Html.ActionLink()to render a link for us, but now due to<i>tag inside the link, we will instead use@Url.Action()method to render a value for the href attribute while leaving the rest of the<a>tag as it is.Inside
<ul class="nav nav-treeview">remove both<li>elements and replace it with:The highlighted yellow lines show the changes we made compared to the original HTML code.
Note: As with the Navbar links, there is an issue with Bootstrap active class. It's hardcoded at the first link (line 2). Check the same StackOverflow page for possible solutions. - The starter page has a section for content header that contains a title and breadcrumbs. Find:
Inside
<div class="container-fluid">, delete everything in it and replace it with:Let's go through the code we just added. All three main Views (
Index.cshtml,About.cshtml,Contact.cshtml) generated by the Visual Studio for the ASP.NET MVC project start with the following line:So, we use the
ViewBag.Titlein line 3, which will display current page title in the content header.The Content header of the AdminLTE starter page also contains breadcrumbs, so we implemented a really basic version of it. The code in lines 7 and 8 check if the current page is not a Homepage and if it's not, it renders a link to the Homepage (line 11). The 2nd level of breadcrumb simply renders a title for the current page (line 14).
-
Now, let's focus on the content itself.
Find:
Inside
<div class="container-fluid">, delete everything in it and replace it with:The main content should now look like this:
The
@RenderBody()renders the content of the View that are not in the named section. Named sections are those parts of the View wrapped with@Section { ... }, so everything else not wrapped in them will be rendered by@RenderBody().
Before the ending </body> tag
- Find:
Replace those lines with:
So, what have we done here? Lines 1 and 2 references the jQuery and Bootstrap bundles inside the MVC project, while line 3 will reference the AdminLTE related scripts. As mentioned before, the bundles are located in App_Start > BundleConfig.cs and we are going to edit this file in the next step.
In line 4, the @RenderSection will render the content of @section scripts { } if the View contains this named section. That can become handy if we have a plugin that is only used in a specific View, so it would make sense to only include plugin-required scripts only in that View.
We will make use of @RenderSection later when we will create a simple Contact form in Contact.cshtml file that uses WYSIWYG Editor and when we will add a Calendar plugin into a Homepage.
Now, let's define which files to include when @Styles.Render() and @Scripts.Render() are called.
6.) Add AdminLTE scripts and styles to bundles
In Solution Explorer, go to App_Start > BundleConfig.cs. Inside it, we find bundles already added by Visual Studio for jQuery, Modernizer, and Bootstrap.
Since we updated Bootstrap to version 4, we will need to also include a Popper library as this is a required library for Bootstrap 4. We can quickly achieve this by including a bundled version of Bootstrap instead of the regular one.
Inside the RegisterBundles() method, find:
Replace it with:
Next, we will add a new bundle that will contain the AdminLTE script and any other scripts needed for our template, for example, scripts from plugins. We will discuss more about plugins in step 8.
At the end of the RegisterBundles() method, add the following code:
Here, we added the AdminLTE script, but we still need to add AdminLTE styles. We can add them to an already existing bundle for styles. Find:
Inside that bundle, add the styles for adminlte.css, so that the end result is:
About site.css
Let's quickly take our attention to the Site.css, which is a stylesheet from the original ASP.NET MVC application. It is located at Content > Site.css. It has CSS rules for the default ASP.NET MVC template that will not be used anymore, so it's better to remove everything inside this file. We can still use Site.css to add our own custom styles.
7.) Fixing image paths of AdminLTE
We now have fixed the layout and modified the bundles to reference adminlte related scripts and styles. But, there is still one thing to fix with the layout, which is the path of images. The starter page is looking for the images at /dist/img/ path, while in our project, the images are inside the adminlte folder.
To fix the images, we need to:
- Open Views > Shared > _Layout.cshtml file.
- In the VS menu, go to Edit > Find and Replace > Quick Replace (Ctrl+H)
- Look for
dist/img/ - Replace it with
~/adminlte/img/. The ~ (tilde) character at the beginning specifies a path to the current root of the web application. - On the right side of the replace field should be two icons. The first one is Replace next (Alt+R), while the second one is Replace all (Alt+A). Use whichever you want to replace all instances of
dist/img/into~/adminlte/img/.
If you run the project now, you might notice that the icons on the top right corner are missing. The AdminLTE uses FontAwesome plugin to show them and we are going to add this plugin in the next section, but first, let's learn a bit more about the plugins in general.
8.) Adding more functionality by using plugins in the AdminLTE template
The AdminLTE control panel can make use of many plugins to extend its functionality, from charts, colorpicker, datepicker, datatables, and so on. There is also a FontAwesome library included there which we will need to add in order for AdminLTE to work as intended. We will do this in the next step 8a.
The extracted adminlte file that we downloaded from GitHub in step 2 contains a plugins folder. We are going to copy this folder into our project in Visual Studio. We could pick and choose which plugin to add, but for the demonstration purposes, we will copy the whole plugins folder into it. Then, we will reference scripts and styles of only those plugins we want to use in the AdminLTE dashboard by editing the App_Start > BundleConfig.cs file.
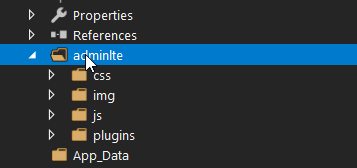
In the Windows Explorer, go to the folder of extracted files we got from GitHub and either drag-and-drop or Copy/Paste the plugins folder from Windows Explorer into the Visual Studio project inside the adminlte folder. The Visual Studio will copy them in the project.
When done, the adminlte folder in Solution Explorer should look like this:
Now, we need to reference the plugin scripts and styles in the App_Start > BundleConfig.cs, depending on the plugins we want to include. See the AdminLTE example page showing different plugins in action.
Finding out how to install any plugin
The best way to find out what scripts and styles to include for a particular plugin, how to use it, and how to install it is to visit the plugin's website. You could look inside the main .js or .css file of the plugin in plugins folder to locate the official link of the plugin.
There is also plugin dependencies of the AdminLTE page for more information about the plugins used by AdminLTE.
Now that the plugins files have been copied into our project, we can finally reference FontAwesome styles that is used by the AdminLTE template.
8a.) Adding FontAwesome in the ASP.NET MVC Project
To make FontAwesome icons work in our project, we need to add a all.min.css style located in adminlte > plugins > fontawesome-free > css folder into the bundles. Open App_Start folder > BundleConfig.cs file and insert the following highlighted yellow code (line 3) into the existing StyleBundle:
And we are done. The Starter page of the AdminLTE template should now be displayed as intended when you run the project in Visual Studio.
Let’s go through a few more concrete examples of adding a plugin and make use of the Summernote plugin that will change the default behavior of <textarea> inside the form into a more useful WYSIWYG editor.
8b.) Adding Summernote Plugin in the ASP.NET MVC Project
Again, we need to add the required scripts and styles into the bundles located at App_Start folder > BundleConfig.cs.
If we look into Summernote Bootstrap 4 example page, we can see it uses summernote-bs4.js for script file and summernote-bs4.css for styles. We already have these two files, since we added the plugins folder into our project. All that is still needed is to include those two files into our bundles.
Open App_Start folder > BundleConfig.cs and inside the bundles.Add() method, find the line that adds the AdminLTE scripts. We add the path of the script for the Summernote plugin (highlighted code on line 3 below):
Next, inside the already existing bundle for the styles, we add the line for the path to the summernote-bs4.css file (highlighted code on line 5 below):
But we are not done yet. We still need to embed it into our page. We will do this next when we turn our attention to the contact page.
Use WYSIWYG editor of Summernote plugin in the Contact page
In the Solution Explorer, open Views > Home > Contact.cshtml. First, let's remove the following line:
We don't need it since the title is already displayed by the code in content-header in _Layout.cshtml file.
Next, let's add a simple contact form. Below <h3>@ViewBag.Message</h3> insert the following code:
We make sure that the textarea field uses id="summernote" (line 11). We will use this id to embed Summernote into it.
At the end of the Contact.cshtml, insert the following:
The code above will initialize the summernote plugin using some of the available options.
You might be wondering why the code is wrapped inside the @section scripts {} block. If you remember in step 5, we were modifying Layout and just before </body>, we added this line: @RenderSection("scripts", required: false).
When a View is rendered and it contains the @section scripts {}, the content inside it will be inserted just before </body> tag.
The contact page should now look something like this:

Visitor Braian Pavanelli asked about the fullcalendar plugin. Let's add this plugin next.
8c.) Adding fullcalendar plugin to AdminLTE template
The first step is to visit the fullcalendar official website and look for example on how to install the plugin.
If we look into the plugins > fullcalendar folder in Solution Explorer, we can see that there is one main.js script file and one main.css file.
Open App_Start > BundleConfig.cs and add the fullcalendar style file (highlighted yellow) into the RegisterBundles() method
Now, we will do the same for the script file. We add the line highlighted yellow:
The script and style files will now both be loaded. All that is left is to embed the calendar into a page.
Adding a calendar into index.cshtml
Open the Views > Home > Index.cshtml file. Inside the 2nd <div class="col-md-4"> add the following code:
This will be a div containing the calendar. We just need to add a script that embeds the calendar. To check what script to add, look into the documentation on their website. For the most basic example, check their Initialize with Script Tags page.
At the end of the Index.cshtml, add the following:
Similar to the Summernote plugin earlier, we make use of @section scripts {}. This code will be injected where we have the @RenderSection("scripts", required: false) in the _Layout.cshtml. By using @section scripts {} in the Index.cshtml, we make sure that the code of the script above will only be included when the Index.cshtml View is displayed.
The end result should look like this:

Conclusion
By creating an ASP.NET MVC project in Visual Studio, we get a web application using Bootstrap Front-End Framework. In this article, we replaced it with the AdminLTE control panel/dashboard template. It is built on top of Bootstrap and it contains many other libraries or plugins that extend its functionality. Finally, we created a simple form on the contact page that uses a WYSIWYG editor and also added a calendar on the homepage.
Joe
August 29, 2017Thanks for the detailed walk through , it really helped.
I have an issue that the Left nav section is not adapting to the different resolution.
The click of the Menu button to make it slide left( navigation drawer kind of effect) is not working nor the button is visible. Any thoughts?
admin
August 29, 2017Hi,
I'm glad you found the article helpful. Regarding the "navigation drawer" not working, check if the "
/admin-lte/js/app.js" file is included. This is where the sidebar toggle menu button functionality is located.Daniel
September 14, 2017Hello Joe,
The fonts I solved by referencing them on the
_Layout. I simply removed this lineand added"~/Content/css/font-awesome.css"to the"~/Content/css"StyleBundle.About the navbar toggle, it's probably because the newer version of AdminLTE doesn't use
/admin-lte/js/app.jsanymore, but/admin-lte/js/adminlte.jsthat is at/dist/js/. Just copy and replace it with the app.js.@liseref
February 11, 2018Hello Daniel, I have same problem and I try to apply your solution. But I confused could you explain more please which code we will change? I mean dist/js whre should we put? Scipt bundle or shared template?
Bart
April 13, 2019The dist/js folder is inside the source code not the admin-lte folder.
I know this is more then 1 year old but maybe it can help someone.
Ernesto Suscriptor
May 22, 2018Hello and thanks by the great tutorial. By the way ¿anybody found a solution to navigation drawer sidebar? I click the options like Dashboard, Charts, UI Elements, etc. and the app shows the links but when I do click on a link (for example Charts->ChartJS) the app close the drawer (Charts e.g.).¿Anybody knows how to hold the drawer open?
MOMIN PATEL
April 7, 2021Great blog. Thanks!
Ehsan
January 17, 2018Hi,
At first, i want to appreciate your article which made my life easier. Following your steps, i could see the admin panel. But the problem is, no icon and image is shown in the panel.
I also changed code based on Daniel advice, but unfortunately isn't fixed.
I downloaded latest version of AdminLTE (2.4.2)
Thanks in advanced.
admin
January 17, 2018Good catch. The latest AdminLTE v2.4.2 doesn't use CDN for the CSS icons.
inside <head> tag, use this code for the links to font-awesome.css & ionicons.css:
<!-- Font Awesome --><link rel="stylesheet" href="https://cdnjs.cloudflare.com/ajax/libs/font-awesome/4.7.0/css/font-awesome.min.css">
<!-- Ionicons -->
<link rel="stylesheet" href="https://cdnjs.cloudflare.com/ajax/libs/ionicons/2.0.1/css/ionicons.min.css">
lev ntr
March 13, 2018Hi,My text boxes are very long.....they span the entire screen,how to solve it?
Jerion
January 22, 2018Hi Pal?
I have one big line on the top of page. why? do you know something about it? just with toggle menu.
your example help me.
thanks a lot.
jesus
March 2, 2018hi, sorry by my englih, it's no good, the problem is in content/Site.css the body has a padding-top:50px; and padding-bottom:20px; you should set on 0px; and for the toggle button you should set ~/admin-lte/js/adminlte.js", on the budlen, in the tutorial say ~/admin-lte/js/app.js",
Slawomir
January 26, 2018Thanks a bunch. Great article
putra
February 7, 2018thanks i found these nice article. i have one big row on top of the header, is there any solution to fix it? Thanks in advanced.
admin
February 7, 2018Hi,
Have you removed the old CSS styles in site.css? Those are the styles of the default ASP.NET MVC application that the Visual Studio creates.
Mateen Ansari
February 7, 2018Hi,
Loved your Article.. Got Stuck at one place - The Navigation Drawer is not working nor the drop downs in the left side panel menu sections.. Please Help.
Martin A.
March 2, 2018I create project .net core with react and redux with Visual Studio 2017. I follow the steps but the problem is in the file bundleconfig.cs (No exist). Help, update your article with this version.
Khairul
March 4, 2018I guess you maybe start the project with empty template. You still can add those file. Refer this
https://stackoverflow.com/questions/21668280/how-do-i-add-bundleconfig-cs-to-my-project
Hopefully, this help you
Ghaby
March 5, 2018Martin, for .NET Core see this project https://github.com/moemura/AdminLTE.Core
kurnis
April 11, 2018Hi!
Congratulation for the article. It's incredible.
I'm trying to add a "Data Table With Full Features" dataTable and I'm following the step 5 to add this component. I add the bundles (css, js and jquery), and the function, but it seems that it only takes the style, but the filter for the number of entries, the search box and the botton navigation by the pages, don't appear. How can I solve it? Thanks
kurnis
April 27, 2018I solved it. I had the same problem with the data table and the calendar. Both didn't appear, and it was because my parameters were incorrects. In the table, the number of fields in the header were different than the number of columns in the table. In the calendar, the array with the events had the name of the fields differents. Thanks in any case.
One question for the Calendar: Is it possible to begin the week on monday?
Thanks
admin
April 29, 2018Hi,
Try adding this option:
firstDay : 1Documentation about it can be found here.
Benjamin
June 7, 2018I love this articles, but the only challenge that I have now is on Global.asax.cs that is where I got stuck. Any time I load the application it will refer to Global.asax.cs that error is there, please what can I do?
sdb
October 9, 2018Hello, if using visual studio 2017 15.8.xx there is libman, just type and use cjdns as source the intellisense will pop up on its own
Misha Khan
October 20, 2018Hello, First of all thanks for sharing this article, but it will be great if you help in adding some more other useful plugins for asp.net mvc AdminLTE template.
Shanadas C
February 11, 2019Hello, thanks a ton for this article! You have explained it pretty well.
Braian Pavanelli
February 25, 2019Nice Article thanks! I'm just having a problem with some Type Scripts of 'fullcalendar'
Error Build:Cannot find name 'JQueryPromise'. 'XXX' C:\XXX\admin-lte\plugins\fullcalendar\dist\fullcalendar.d.ts 1615Could you help with this issue? Or any tip?
Thanks
admin
February 25, 2019Hello,
This article is quite old now, I intend to do a complete rewrite in the near future. I have now quickly added the guide on how to add fullcalendar plugin at the end of this article. I hope, you will find it helpful.
Gatien
February 26, 2019Hi, thanks a lot for the article. I can't find the starter.html in the zip file, i think they've renamed/removed it but I might be wrong. Can anyone help please?
Here's the link i used to download the sample archive.
https://github.com/almasaeed2010/AdminLTE/archive/v2.4.9.zip
Thanks
admin
February 26, 2019Thank you for your comment. You are right, the last version AdminLTE v2.4.9 doesn't seem to have everything. Just download the previous version AdminLTE v2.4.5 at https://github.com/almasaeed2010/AdminLTE/archive/v2.4.5.zip
Also note, this article was written almost 2 years ago for AdminLTE v.2.4.0, so there might still be some differences.
Aslal Shaja
March 22, 2019Hi, thanks a lot for the article its very useful for me. I applied into my asp.Net MVC Page Its working But, Menu didn't work such as
1) sliding right to left when I click Sidebar Toggle.
2) menu icons are not showing (but top icons are working envelope ,bell, task)
3) Sub menus (treeview-menu) don't working
please help me
admin
March 25, 2019Hi,
This looks to me that the custom JavaScript code is not running. I looked at the latest version of AdminLTE v 2.4.10 and they seem to rename that file from app.js to adminlte.js.
In the beginning of the section "4.) Add AdminLTE scripts and styles to bundles" just replace:
bundles.Add(new ScriptBundle("~/admin-lte/js").Include("~/admin-lte/js/app.js"));
with
bundles.Add(new ScriptBundle("~/admin-lte/js").Include("~/admin-lte/js/adminlte.js"));
Let me know if this fixes your issue.
Rickson
April 17, 2019Hi Admin, This worked for me thanks alot
aspnetcoreuser1
April 13, 2019Hi.. May I know how can I apply this in Asp.Net Core 2.1?
consumeTech
April 30, 2019Hi, thanks very much for this article, I have been struggling get this straight forward information about how to use AdminLTE. Thank you very much once, As been reviewing questions and answers I am also about to start following these steps. could you please help if i struggle along the way thank you in advance
admin
May 1, 2019If you have any issues, let me know. Just be aware that this article was written almost 2 years ago for AdminLTE v.2.4.0, so for the current version it is a bit different in some places. I intend to update the article in the near future.
Octavio
November 29, 2019Hi, I'am followed all the steps, but my webpage is not working. Right now last version Release is AdminLTE-3.0.1 and many fields are differents.
Thank you so much!
Buckethead
December 5, 2019I got the same issue similar to Octavio that header and left navbar isn't render properly. Any advise to solve it?
Thulani Moleme
May 1, 2019Hi, thanks a lot for this article, I am using AdminLTE-2.4.10. but I'm having problems I can't find this in the , something close to it is this . Should I remove that one?
admin
May 2, 2019Hi,
Part of your comment seemed to contain HTML code that has been filtered out. You need to encode any HTML code that you add in your comment using online HTML encoding tools like this one https://opinionatedgeek.com/Codecs/HtmlEncoder
Frank
June 19, 2019Hola, gracias por el artículo. Una consulta puedo utilizarlo junto con AngularJs en MVC4?
Dil Lil
September 10, 2019Hello,
I am creating a website using ASP.NET Forms and i added AdminLTE to my project through NuGet packages but the header and other stuff do not show up. I only need them.
So i pasted the code to master page and edited it the right way. And the components appear correctly.
But the entire website looked zoomed out. In other words all the text, pic, boxes etc looks small and i cnt even read some of them.
Any idea why..?
Thank You.
Dil lil
Rakesh
November 28, 2019I followed all the steps. But i am getting an error saying
Error Build:Module '"../../../../../../../../Users/XYZ/source/repos/Web-demo3/admin-lte/plugins/filterizr/FilterizrOptions/defaultOptions"' has no exported member 'RawOptionsCallbacks'. Web-demo3Can you please help me?
admin
November 28, 2019Hi,
I'm not familiar with the filterizr plugin, but according to this AdminLTE GitHub Issue, you should load the dist .js files and not the .ts files.
Buckethead
December 4, 2019Hi,
Thanks for the article written for us.
I doubt if there is 2.4 version on VS as I have problem with the styling on Navigation bar after follow the steps from this article, which replacing the template.
admin
December 5, 2019Hi,
The AdminLTE 2.4.0 version is still available in GitHub HERE.
I'm currently writing one article and after that I intend to update this one with the latest AdminLTE version, as the 2.4.0 from 2017 is a bit old now.
Narwhal
May 26, 2020Did you end up writing an updated article on this? I couldn't find one and wanted you to know that I would be very interested in it.
admin
May 27, 2020Hi,
Thank you for your interest. I'm going to update this article next.
Update
The article has now been updated for the AdminLTE v3 version.
Jamie Swindall
July 6, 2020Has anyone had any luck with the Treeview plugin?
admin
July 6, 2020You could try jsTree, which is a free jQuery based library.
Pawan
August 8, 2020Hii,
i am using this article. it is very easy to understand .i am done all option and result show as per requirement.
but i have one problem. my index page not show in proper way .sidebar menu cover my index page .i want to adjust my index page?
-> my code ->
<!-- Content Header (Page header) -->@RenderBody()
<!-- /.content -->
admin
August 21, 2020Hi,
It's hard to know what the issue is without more information. I would suggest to open "Developer Tools" in Chrome browser and look for any JavaScript errors. If there are, check if all Javascript scripts loaded properly.
me you
December 8, 2020Note that you forgot to mention that we need to add the plugins folder with the others, I couldn't display the icons without the plugins, you mentioned at the beginning that we only need to import 3 folders from the dist file, but thats not the case, in addition you actually need to add the plugin folder too. so anyone whos wondering why the icons are not working just add the plugin folder with the other ones.
thanks
great article by the way.
Wendollin
December 23, 2020Excellent article, so clear and detailed!! Thanks for explain all the details walk through, it really helped me!
emre
January 18, 2021Excellent article. Thanks
Vianney
February 17, 2021This Article is helpful, Thanks
Ela
May 5, 2021Thank you!
Nazim
July 24, 2021Hi admin,
This article is awesome. I am facing a problem, i am using asp.net mvc4, I have done all steps as mentioned. But when I run the project, css is broken. But if i use links (css) directly in _Layout, it works. It is not working with Bundling. What can be the issue ? Thanks
admin
July 25, 2021Hi,
Check in
global.asaxfile, if you have a code that registers bundles. It should look like this:protected void Application_Start(){
...
BundleConfig.RegisterBundles(BundleTable.Bundles);
}
nazim
August 1, 2021Yes this line of code is there already. But it is still not working.
nazim
August 1, 2021solved the issue: got help from this: https://stackoverflow.com/questions/11985431/why-is-my-css-bundling-not-working-with-a-bin-deployed-mvc4-app
Do not use /css with Bundle name. Content/css, use Content/styles it worked.
bundles.Add(new StyleBundle("~/Content/styles").Include("~/Content/bootstrap.css",
"~/adminlte/css/adminlte.min.css",
"~/adminlte/plugins/fontawesome-free/css/all.min.css",
"~/adminlte/plugins/summernote/summernote-bs4.min.css",
"~/Content/Site.css"
));
aruna
February 2, 2022hello datetime not working this version not datepicker
admin
February 3, 2022Hi,
Did you use AdminLTE v3.0.5? The latest stable release is v3.1.0 and I intend to update the article for this release in the next few days.
aruna
February 3, 2022yes i followed user above artical.date picker not working
admin
February 4, 2022I have now updated the article for AdminLTE v3.1.0.
Regarding the problem you are having with "fullcalendar" plugin, I suggest switching to a newer version (at least v5.5.1 as this is the version AdminLTE 3.1.0 uses) and installing it by going through steps 8c) in this article.
You just need to replace the old plugins > fullcalendar folder in Solution Explorer with the files of new version of "fullcalendar" plugin. Get these files from the fullcalendar GitHub page or download AdminLTE v3.1.0 and use their files.
Thank you very much for notifying me about this problem.
Joel
February 27, 2022I had an issue before using a youtube video and adding the whole index.html page instead of the started and was so slow my localhost. Following this guidance, I'm so happy with how light and easy step-by-step helped me through the installation. thank you.
Ian
March 7, 2022I'm using VS2022 and having a few problems, suspect I'm missing a NuGet Package somewhere. I followed you guide above (except using 3.2.0 adminlte) but now stuck on Step4.
I'm getting red underlines on @Styles.Render and @Scripts.Render
My project (ASP.NET MVC) doesn't by default have a folder called App_Start or a file BundleConfig.cs. Do I create these manually or is the missing NuGet package going to create those for me?
Likewise Step 6 I'm getting a red underline on bundles.Add.
I've added the "Microsoft.Aspnet.Web.Optimisation" package, what others do I need. Annoyingly no tool tip suggestions either.
admin
March 7, 2022Hi,
It seems to me that you created an ASP.NET Core Web app MVC project (.NET Core) while the article uses ASP.NET Web Application (.NET Framework). As already mentioned in the article, you might not see the ASP.NET Web Application (.NET Framework) template if a specific component is not installed in the Visual Studio.
Check this article on how to install .NET Framework templates.
The errors you are getting is because .NET Core doesn't have bundling anymore. You would need to replace them with
<code><script src="..."></script></code>HTML code.ChitKoKo
April 13, 2022Thanks for your solution and my teacher
Luiey
April 20, 2022This article is support for AdminLTE v3.2.0 update?
admin
April 20, 2022Thanks for letting me know about the new AdminLTE version. I have now updated the article for AdminLTE v3.2.0. The only difference from v3.1.0 is that it now uses the Bootstrap 4.6.1 version.
Rayaan
July 29, 2022Hey if any other beginners are trying to do this, I learned that when you are updating your packages VS will notify you to download TypeScript, don't. It causes problems, or at least it did for me.