Recently I was experimenting with WebAssembly, a binary format that can be executed in JavaScript environments, such as browsers. It was a lot of fun and I want to share how to create a simple web page that is using wasm module written in Rust language. We will use wasm-bindgen-cli tool to generate .js files and then create a web page that uses the wasm module and test what we created in the browser.
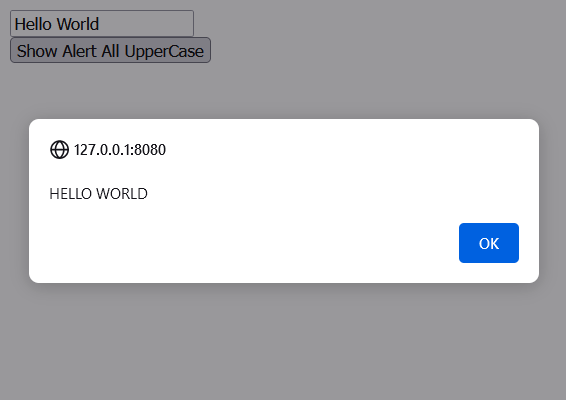
The web page is simple as it can be for demonstration purposes. There will be an input field and a button. When you click on it, it will call the Rust function in the wasm module which will display JavaScript alert popup with the text from the input field in all capital letters.
We can use this project as a starting point from which we can build-up on to something more functional and interesting.
1) Requirements - Rust & Web Server
To test the web page in the browser, we will need a web server running on the local machine. One option is to install Apache on Windows, but a quicker way is to have Python installed on your Windows system and then run a local webserver from a command line.
The tutorial assumes you already have Rust installed on your machine. If not, go through the Installing Rust on Windows article first.
I would highly recommend using a code editor that supports Rust such as VS Code. Check installing VS Code on Windows article to learn more about it and how to install it.
2) Installing wasm target
Having installed Rust is not enough though. We also need wasm32-unknown-unknown target available for our active toolchain (installation of the Rust compiler). We will make use of the wasm32-unknown-unknown target in step 7, when we build the Rust project into wasm binary.
We install the target by using the following command on the terminal:
We can confirm that it has been added by using the command:
You should see wasm32-unknown-unknown listed under "installed targets for active toolchain", something like this:
--------------------------------------
wasm32-unknown-unknown
x86_64-pc-windows-msvc
active toolchain
----------------
stable-x86_64-pc-windows-msvc (default)
rustc 1.62.1 (e092d0b6b 2022-07-16)
We should now have everything we need. So let's get started by creating a new Rust project.
3) Create a new Rust library project
We will need to create a library-type project and we do that with this command:
This will create a new folder simplewasm. Go inside it using cd simplewasm command. We can also create project files in the current directory, by using the cargo init --lib command instead.
Next, we need to install a wasm-bindgen-cli tool, which we will use to generate files needed for the interaction between JavaScript and the wasm module.
4) Installing wasm-bindgen-cli tool
With the wasm-bindgen-cli command line tool, we will be able to deploy WebAssembly created by Rust to the web by binding the wasm module with JavaScript. We use the following command to install it:
This might take a while to install. The last line of the installation process should say something like this:
By typing the wasm-bindgen command, we can confirm that the tool has been successfully installed. It will complain with "invalid arguments" message. We will use this tool for real in step 8.
It's time to focus on the project itself. If you are using VS Code editor, type code . to open the project in VS Code.
5) Modifying Cargo.toml file
The Cargo.toml is a configuration file for our project and here we are going to add dependencies and other settings related to WebAssembly.
Our Cargo.toml will have the following content:
Let's take a closer look at the highlighted lines.
-
Lines 8-9 - Adding dependencies
In the previous step we installed wasm-bindgen-cli tool and it uses the wasm-bindgen crate so we need to add that as a dependency to our project.
-
Lines 11-12 - Setting a library type
Next, we need to tell the Rust compiler that our library will need to be a dynamic system library as they are used when the library is going to be loaded from another language.
-
Lines 14-15 - Optimizing for a smaller binary size
Since the wasm module will run in the frontend, it's good to reduce the size of the
.wasmfile. We can do that by using the opt-level setting for the dev profile, which is a default profile for debugging and development.
6) Modifying the src/lib.rs file
We add the library code inside the src/lib.rs file. First, we can remove the generated test function inside it and replace it with the following code:
use wasm_bindgen::prelude::*;
// Import 'window.alert'
#[wasm_bindgen]
extern "C" {
fn alert(s: &str);
}
// Export Rust function to js
#[wasm_bindgen]
pub fn alert_with_allcaps(s: &str) {
    alert(&all_uppercase(s));
}
// Regular Rust function - not available from js
fn all_uppercase(s: &str) -> String {
    s.to_uppercase()
}
In the first line, we import the wasm_bindgen crate. The rest of the code contains three functions (highlighted yellow). Let's go through each one:
-
Lines 3-6 (importing JS function)
Here, we are importing the JavaScript
alert()method so that it is accessible in Rust. First, we annotate it with the#[wasm_bindgen]attribute, then we use Rust extern keyword which tells Rust that it can call the foreign external function and inside the block, we have the function's signature. -
Lines 8-11 (exporting Rust function)
And here we are doing the opposite. We are exporting the Rust function so that it may be available in JavaScript. Again, we must annotate the function with the
#[wasm_bindgen]attribute and it needs to be public with pub keyword.We will call this function from
index.htmlfile in step 9.The function makes use of imported JavaScript
alert()method and a regularall_uppercase()Rust function. -
Lines 13-15
Here, we just have a normal Rust function that returns a string in upper case. It doesn't have the
#[wasm_bindgen]attribute, so it will not be available in JavaScript.
7) Building the library
We now need to compile the library project. We need to tell the Rust compiler to use wasm as a target:
If the build was successful, we should see several files inside the /target/wasm32-unknown-unknown/debug/ folder, one of which being simplewasm.wasm file. We will use the path to this file in the next step.
.wasm file and instead have the .rlib extension, it's most likely because the library type is not configured in Cargo.toml file. Check Step 5 on how to fix that.8) Generating the web folder using wasm-bindgen-cli tool
We created the .wasm file in the previous step and now we need to deploy it for the web. We will use the wasm-bindgen-cli tool installed in step 4. Enter the following command:
We used the following parameters:
- target/wasm32-unknown-unknown/debug/simplewasm.wasm
This is the path to the wasm library file we built in the previous step. - --out-dir ./web/
With --out-dir we set the output directory in which all the generated files will be placed. In our case, it will be in thewebfolder at the root of the Rust project. - --target web
By default, the --target is set to bundler, which would mean we would have to use a bundler like webpack. To avoid bundlers altogether, we used --target web which will allow us to run the code directly in the browser.
Note: Learn more about different values for the --target parameter here.
.rlib library file instead of the .wasm file. Jump to Step 5 and check if you have lines 11-12 in the Cargo.toml file and rebuild the project.If we look into the generated web directory, we should see something like this:

The generated .js file is the glue that connects the JavaScript world with the .wasm module. It allows for communication between JavaScript and Rust. We still need to create an index.html file that will load the generated .js file and then we will be able to import Rust functions and call them from the index.html file.
9) Creating the index.html inside the web folder
Inside the web folder, create an index.html file and insert the following content:
Let's have a look at the most interesting parts of the index.html file:
- Line 8
Here we can import functions from the wasm module. We can only import public Rust functions that have
#[wasm_bindgen]attribute macro and we put the function's names between{}brackets separated by,comma . In our case, we only have one function to import which isalert_with_allcaps. - Lines 10-15
After
await init();in line 10, we can put our own custom JavaScript code that will use the functionality of the wasm module. In line 12, we assign an anonymous function to the onclick event of the button. Inside that anonymous function, we get the value of the input field and use it when calling the wasm Rustalert_with_allcaps(msg)function. - Lines 19-20
And here we have the HTML elements that are used by our JavaScript code.
10) Running the server
To test the index.html, we need to run a local web server. The easiest way is to make use of the following Python command.
You should see the following message in the terminal:
The web server root will be the folder from which we ran the above command. If we ran it from the Rust root project folder, we can test our web page by opening the browser at the following URL:
A webpage with an input field and a button beneath it should open up. Clicking on the button should display an alert message with the input value in all caps.
Conclusion
In this tutorial, we created a simple web page that makes use of the WebAssembly created in Rust. On the front end, we were able to call the Rust function from JavaScript, and inside the Rust module, we were able to import the JS alert() method. The connection between JavaScript and the wasm module was created using the wasm-bindgen-cli command line tool. And to test what we created, we had to running a local server.